In today’s e-commerce environment, Facebook remains one of the most core advertising channels. For Shopify independent store sellers, fully integrating Facebook with Shopify enables closed-loop functions such as product synchronization, conversion tracking, dynamic ads, and social shopping.
This article is a practical, step-by-step guide that tells you how to seamlessly connect Facebook to Shopify.
I. Benefits of Connecting Facebook to Shopify
Connecting Facebook to Shopify may sound “technical”, but the benefits it brings are very tangible. The main benefits are as follows:
1.Automatic Synchronization of Product Catalogs
There is no need to manually export CSV files and then upload them to Facebook. When you list, edit, or delist products on Shopify, the changes are reflected in the Facebook catalog in real time.
2.Seamless Conversion Event Tracking
User behaviors such as browsing, adding to cart, placing orders, and making payments will be sent back to Facebook via Meta Pixel (formerly Facebook Pixel). The advertising system uses this data to optimize ad delivery and conduct retargeting.
3.Support for Dynamic Ads and Product Ads
With Facebook’s dynamic ads/Catalog ads, you can display the most suitable product combinations based on user behaviors, without the need to manually configure ad materials for each user.
4.Synchronization of Inventory and Prices to Reduce Misplaced Ads
When Shopify updates inventory or prices, the Facebook catalog is also updated simultaneously, avoiding wasted ad budgets caused by dead links that lead to out-of-stock or delisted products.
5.In-Social Shopping Experience
Customers can browse and purchase products directly within Facebook, enhancing the user experience and shortening the shopping path.
6.Precise Ad Optimization and ROI Improvement
With real order data flowing into Facebook, the advertising system can learn and optimize the target audience more quickly, thereby reducing the cost of driving traffic.
II. Complete Practical Guide to Connecting Facebook to Shopify
1. Preparations
- Facebook Business Manager (Business Management Platform)
Ensure the account is in normal status, with no restriction records, and that business verification has been completed.
- Ad Account (Ads Manager)
The account must be in an “Active” status and have ad delivery permissions.
- Facebook Pixel
It is used to track user behavior data on the Shopify website, such as browsing, adding to cart, and placing orders.
- Shopify Store Administrator Permissions
You need to have permissions to install apps/sales channels; otherwise, you cannot complete the authorization and connection process.
- Bound Independent Domain
The domain bound to the Shopify store must complete domain ownership verification in the Facebook Business Manager backend. This is a necessary condition for subsequent catalog review and store launch.
2. Enable Facebook Channel Authorization in the Shopify Backend
- Log in to Shopify → Select 「Settings – Sales Channels」 from the left menu.
- Click 「Add Sales Channel」 and choose “Facebook & Instagram by Meta”.
- A connection guide will pop up → Click 「Start Setup」.
- Select the Facebook Business Manager and ad account you want to connect.
- Authorize permissions for the catalog, Pixel, and homepage, and ensure all are in the “Connected” status.
Tip: If you see “Permission Not Granted” or “Account Not Eligible” during authorization, it is most likely an issue with the IP, region, or account login environment.
Therefore, for a stable connection environment, it is recommended to use a stable proxy IP tool, such as IPFoxy. It provides native residential IPs in multiple countries and cities, which can be used for:
- One-click switch to the target region’s IP to simulate the real location of the merchant.
- Logging in to Facebook Business Manager with multiple accounts without sharing fingerprints, reducing the risk of association.
- Maintaining a clean and isolated environment when operating multiple ad accounts for Shopify sub-stores, improving the success rate of connections.
For independent store sellers who want to run Facebook ads in multiple markets, the combination of IPFoxy + Shopify + Facebook integration is a complete set of secure operation solutions, avoiding connection failures or ad account restrictions due to IP and environment issues.
3. Authorize Your Facebook Assets
In the Facebook channel of Shopify:
- Click “Start Setup”.
- The system will ask you to log in to your Facebook account and select the corresponding Business Manager.
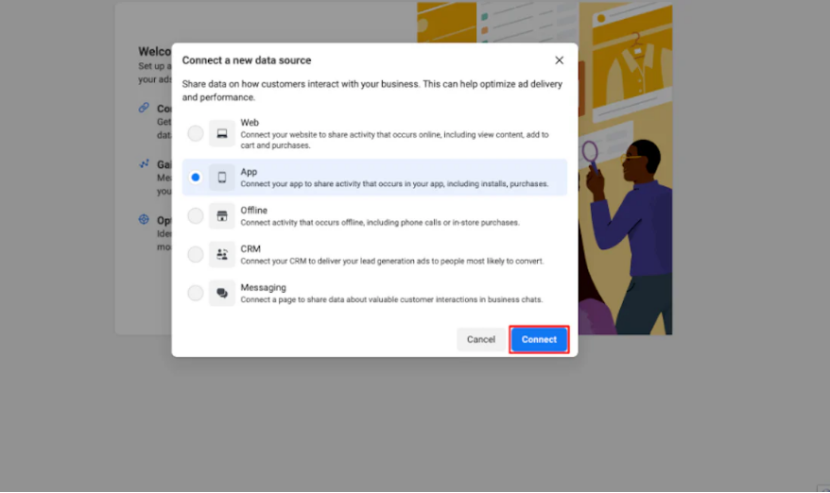
- On the authorization page, select the Facebook Page, Business Manager, ad account, and Pixel you want to connect. When authorizing these assets, ensure you have the corresponding permissions for them on Facebook; otherwise, the authorization will be rejected.
- During the authorization process, the system will also ask you to select the data sharing level (Standard / Enhanced / Maximum). It is recommended to select “Maximum” (the most permissive, allowing the most data to be sent back).
If the authorization of a certain asset fails, it is usually because you do not have the corresponding management permissions on Facebook, or the Page/ad account has not been associated in the Business Manager.
4. Product Catalog and Pixel Configuration
Shopify will automatically create a product catalog (Catalog) for running Facebook dynamic ads.
Select “Maximum” in 「Data Sharing Settings」 (recommended), which supports simultaneous tracking of browser and server events.
After completion, go to Facebook Events Manager to check if the Pixel is sending back data.
Testing method: Open the Shopify store → Browse any product → Check if the “View Content” event is captured in Facebook Events Manager.
5. Ad Account Binding and Conversion Tracking Verification
Log in to the Facebook Business Manager backend → Select 「Catalog Manager」.
Check if the newly synchronized Shopify catalog is displayed as “Active”.
Click 「Create Ads」 to test launching a dynamic ad campaign, and select “Use the connected Shopify catalog”.
If the catalog cannot be selected, first check whether domain verification and Pixel binding have been completed.
6. Complete the Facebook Store Review and Launch Process
After connecting the catalog and Pixel, you also need to complete the following steps: In the Shopify channel, select the products you want to synchronize to Facebook, and submit your store for Facebook review. After passing the review, your Shopify products will be displayed in the Facebook Store; if the product review is rejected, check the rejection reason in the Facebook Business Manager backend and make adjustments one by one.
If you only want to use Facebook for advertising (and not allow customers to place orders within Facebook), you can run ads without going through the store review.
Summary
Connecting Facebook to Shopify may seem cumbersome, but the key lies in getting through the aspects of preparation, permissions, verification, synchronization, review, and a stable environment. This article provides a clear, actionable path covering asset preparation, channel installation, authorization and connection, catalog synchronization, store review, and troubleshooting.