Instagram has evolved from a “photo and text social platform” to a closed-loop ecosystem integrating “content + e-commerce”. For DTC independent website brands and sellers of emerging niche categories in particular, Instagram Shop is a key tool for acquiring cold-start traffic, reducing ad redirection costs, and boosting conversion rates. However, many merchants face frequent rejections when applying for Instagram Shop—either their materials fail the review, or the Shopping Tags don’t display after the Shop is set up—wasting time unnecessarily.
This guide will walk you through everything from account requirements and setup steps to review considerations, helping you avoid pitfalls in one go.
Contents
- I. What Are the Benefits of Instagram Shop
- II. Complete Step-by-Step Guide to Setting Up Instagram Shop
- Conclusion
I. What Are the Benefits of Instagram Shop
1. Core Value of Setting Up Instagram Shop
- Support direct product link attachments in posts, Reels, and Stories, significantly reducing drop-off rates from redirects.
- Integrate with Meta Ads to display product cards directly during ad campaigns, resulting in higher click-through conversion rates.
- Display Shopping Tags without meeting a minimum follower threshold, enabling more efficient conversions compared to traditional redirection to independent websites.
- Establish an official brand product Catalog to enhance brand credibility and professionalism.
2. Which Merchants Are Most Suitable?
- Merchants with independent websites/DTC brands looking to drive direct conversions from content.
- Sellers targeting markets with active IG traffic, such as Europe, the United States, Japan, and South Korea.
- Content teams capable of creating short videos and image-text seeding content, aiming to drive conversions via linked content.
- Teams with limited budgets seeking to increase click rates through organic traffic exposure + Shop Tags.

II. Complete Step-by-Step Guide to Setting Up Instagram Shop
Step 1: Verify Account and Regional Eligibility
- The IG account must be a Professional Account.
- The region must be on Meta’s list of countries supporting Shops (e.g., the United States, the United Kingdom, Canada, Australia, and select European countries).
- The independent website must have a legitimate shopping system, return policy, privacy policy, and payment methods.
Pitfall Alert: A large number of merchants get rejected due to “incomplete privacy policies on independent websites”. It is recommended to clearly display the Return Policy, Privacy Policy, and Terms & Conditions on the website; otherwise, there is an 80% chance of failing the review.
If the account’s login IP is unstable or located outside Meta-supported regions, the review will be rejected immediately. This issue not only affects Shop setup but may also lead to ad account suspension for “suspicious commercial activities”.
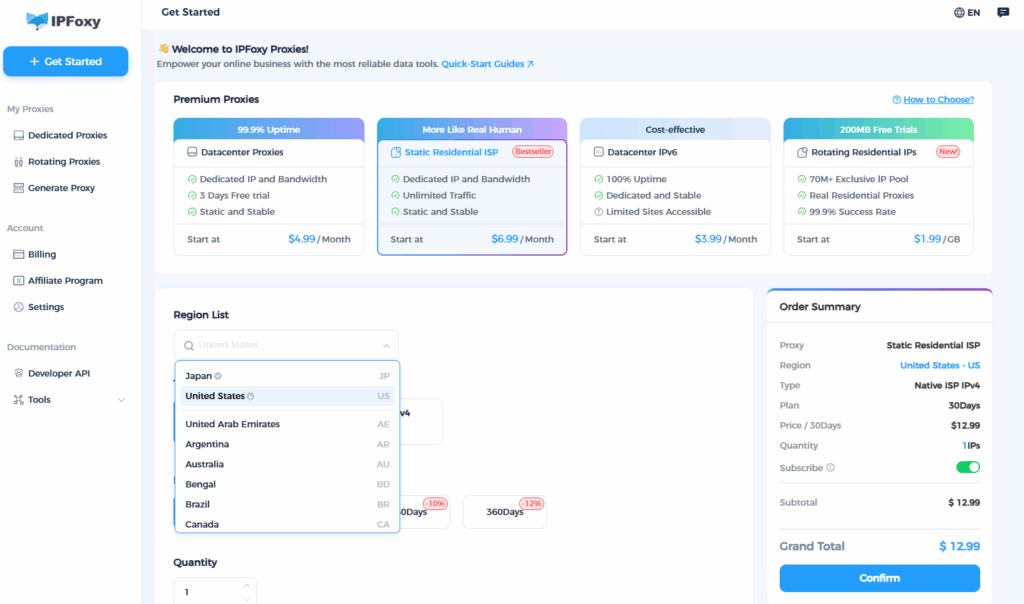
To address this, we highly recommend using a proxy like IPFoxy to simulate a local IP environment in your target market:
- Provides residential IP resources to avoid being flagged as “mass registration” by systems (a common issue with data center IPs), making it easier to simulate real user logins during the review phase.
- Allows configuring independent, clean IPs for each Meta account, reducing the risk of triggering system risk controls.
- Offers high stability, ideal for sensitive operations like long-term account nurturing, ad campaigns, and Shop setup.
It is advisable to maintain the same regional residential IP environment throughout the application cycle. Proxies like IPFoxy can effectively reduce the risk of rejection.
Step 2: Connect Meta Business Account and Product Catalog
- Log in to Meta Business Suite → Navigate to Commerce Manager.
- Create a product Catalog using one of the following methods:
- Manually add products.
- Automatically sync independent website products via Facebook Pixel.
- Directly import products by connecting to independent website systems (e.g., Shopify, WooCommerce).
Pitfall Alert: Inconsistencies between Catalog information and official website SKUs will trigger a “content mismatch” review warning. We recommend ensuring SKU names, prices, and image-text information are identical across both platforms.
Step 3: Link Instagram Account and Submit for Review
- Go to IG Settings → Business → Shopping → Connect to your Meta product Catalog.
- Fill in required information (e.g., company details, tax documents—VAT/EIN may be required in some countries).
- Submit for review. The official review cycle typically takes 3–7 days.
Pitfall Alert: If the review is stuck for more than 7 days, proactively contact Meta Support and provide relevant materials to accelerate the process.
Step 4: Remedial Measures for Review Failure
- Review Approved: IG will automatically activate the Shop entry → You can now add Shopping Tags to posts/Stories/Reels.
- Review Rejected: Check for the following issues and resolve them before resubmitting:
- Missing policy pages on the website → Supplement the pages and resubmit.
- Products involving sensitive categories → Rename the Catalog category.
- Fluctuations in login environment → Switch to a fixed residential IP and reapply.
- Account with no daily operational content → Publish several normal posts before reapplying.
Practical Tip: Empty accounts (with no content) have a very high risk of triggering review controls when applying for a Shop. It is recommended to first nurture the account with a few posts or Reels.
Conclusion
While the Instagram Shop setup process seems standardized, the core checks focus on authenticity, stability, and compliance. If you get stuck in the review phase, 80% of the time the issue is not with your materials, but with an inauthentic IP environment or account behavior flagged as abnormal. As long as you set up a real, stable environment in advance, navigating the Instagram Shop setup process is actually quite straightforward.